 one of the "it might as well be spring" slippers. I just need to embroider the 2nd one and felt and they will be ready to wear!
 Baby hat I made with really wonderfully soft chenille yarn for my acupuncturist's new baby. I admit I was a little jealous of her wee one getting to wear something this lusciously soft while I went without LOL!
 Calorimetry- a short row shaping project. This one undertaken for my friend who wanted a head wrap to keep her head and ears warm that didn't require one to have their hair loose. I am seriously in love with this yarn! And one of these days I will undertake a Calorimetry for myself.
 The infamous mitten...my first major fair isle project, my first mitten. It was crafted during the days this winter when my resolution to learn every knitting technique, pattern and style that I did not already know was still steaming away at full speed ahead. And the pattern was clearly written by a crackhead for whom English was a second language- with NO errata sheet available! it turned out to be an enormous exercise in frustration and is presently serving as a reminder to me that a) second mitten syndrome really is a plague suffered by many knitters and b) perhaps painfully complicated projects should NOT be undertaken on a "now make another one" scale :P
 "Snips and snails and puppy dog's tails" booties I made for my acupuncturist's new little baby boy. Made from super soft felted wool with embroidery added after felting, these were so adorable and snuggly I knew I was going to have to make a pair of felted slippers for myself. Ah, the perils of crafting- for every one item I make to gift or sell, I have to make one for myself as well!
 Yarn Tamer- another item that I'm going to have to mass produce for the holidays this year. I know a lot of people who would love this dandy little zippered pouch to keep their yarn from tangling while working projects.
 A few tea wallets- these brilliant little purses hold a few tea bags or other drink packets, as well as sugar or honey to keep them tidy in purse or pocket for the journey to work or about town. They make fantastic last minute gifts, are easy to knit, crochet or sew at a moment's notice and I keep telling myself I need to keep a few on hand at all times for hostesses, etc. but I give them out too fast!!
 And lastly, a cowl I fashioned from the cowl neck off of a lovely blue merino wool sweater. After I cut the cowl off, I used my serger to seal the cut edge to prevent fraying and I get a ton of use from this one too!
 My favorite cowl- candleflame is the name of the pattern and I thought this yarn really lent itself well to a pattern by that name!
  Another cowl- they really are indispensable in a girl's wardrobe- I wish I had one in every color!
 2 cowls- the rosy colored one was my first cowl knit in the round- made from a delicious alpaca blend in a pattern called "lettuce vine". The button up is ADORABLE on, but almost too warm to wear indoors!
  This hat, which is now hubby's, was the "rough draft" for the hat I made my brother in law for his birthday. The final product had a checkerboard effect with the skulls- alternating white and gray, which too, FOREVER to finish! That's the only trouble with knitting- it takes about 3 times longer than crochet to finish!

 A collection of aprons I made for my relations for Christmas from tea towels- an infinitely useful thing to have an apron made from! And I thought these were super adorable to boot :)

Hats for my nephews for Christmas- I think they were a hit. Made of snug fleece, I was well proud of them!
 My fetching owl hat. I found the pattern and loving all things owl, HAD to have one. Did I wear the super warm hat all during the cold winter? Nooooo, I wore the adorable owl family!
 The COMFIEST PJ pants ever! Made from my favorite source of soft fabric, sheets, these were also a Christmas present for D, but he almost didn't get them at all! I was a good wife and didn't steal them from him before gifting- I figured that was a surefire way to end up on Santa's naughty list ;)
 Welding Apron I made for D for Christmas- it's getting a lot of service as he finishes up patching in the new floor in the Chevy!!
My superwarm winter hat- in pink and camo! My favorite colors! Naturally, once I got the hunting hat done for hubby, I had to have one myself :)
 This Raiders scarf I had to make double time for my boss for our "secret santa" at work. I was hoping I'd draw a female so she could get some of the ever popular fingerless mitts, but... LOL and of course- no pressure crafting for the boss! But all in all, despite the fact that it took about 3 hours to stitch the insignia on, I think it turned out quite well!
 This darling little hat I made for my hubby to keep him warm for hunting. Blaze orange and camo yarn! I do recommend using the super bulky yarn for warmth though- if I'd have used just worsted weight it wouldn't have been warm at all so many thanks to Jenny for the tip! In fact, I loved it so much I'm going to make one for myself, once the holiday crafting is complete anyway. And once I relearned how to purl after 20 years of not doing it, knitting in the round was a snap! :)
 My first pair of fingerless mitts- I think they turned out quite well. And they've been a lifesaver at the office where its always soooo cold! They're lovely for gifting too!

A lovely pair of fingerless gauntlets with interchangeable ribbons - made as a gift for a dear friend who is moving to California.

My Halloween skirt- I fell in love with the fabric and had no idea what to do with it until my friend Peaches made an adorable tiered skirt for her friend's daughter. I added hot pink polka dots and tulle for an edgier look, and it has gotten tons of compliments so far!
 Based on some scarves a friend has for her dog to wear in the winter, that are supremely cute (even if not real practical), I made this thinking perhaps I could make some to give my dog owner friends for christmas. I think it turned out very cute, although I did make the keyhole with 2 chains and should have only used one so it wouldn't gape quite so much. I'll do better with the next one!
  A lovely nightgown/chemise that i made from a sheet and some lace and ribbon. I based it on a renaissance "tunic" I used to make to go under a vest and skirt. The hubby picked it out of a pattern book, and it was surprisingly easy to make.
  There are plans in the works for a midnight violet one with pale pink lace, and a red one with black lace.
 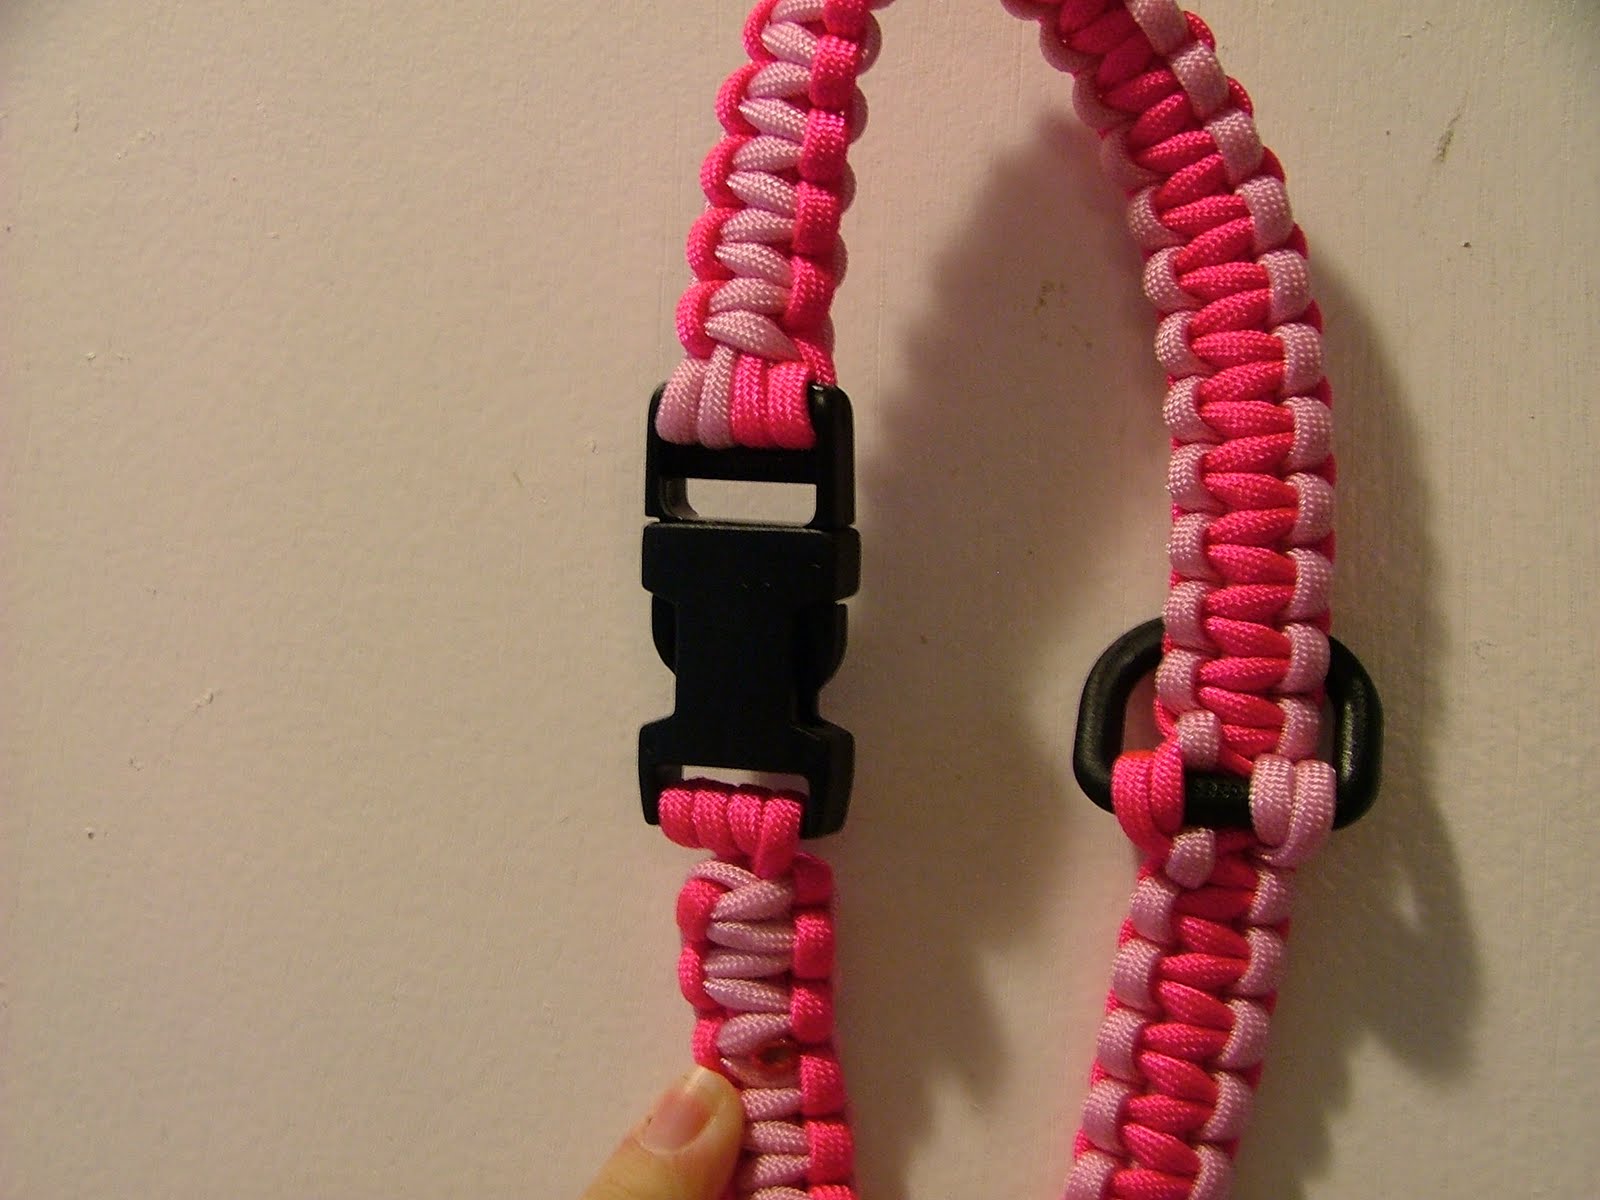 A series of dog collars I've made. These are super fun because they're reversible, and pretty much guaranteed that your dog can't destroy them!
  Eventually, Sadie did outgrow the single knot collars, and has not moved on to double knot. I LOVE her new collar!
 Another apron, this one made from a men's pajama shirt. I've never used a full length apron before, and this one has now become my fave kitchen apron :)
 My recent obsession has been with apron making. This one is for my mother-in-law.


 A bunch of shirts made this week- I've been a flurry of activity with sewing! Still have a few more projects up my sleeve that need to get done too, so stay tuned!
 The rug I made for Mother's Day for D's mom. The oblong rugs are a little tricksy, but this one turned out really well, I thought, and she loved it! I've got another rug in the works already, but am having a little trouble working it so it lays flat. So it could be a while before that one shows up LOL!
 I LOVE this shirt! and now I have something else cute to wear so I can stop wearing the yellow one all the time :P This one is based on a shirt that belongs to a friend that I loved so much I had to borrow it and figure out the pattern. It took several frustrating hours, but the pattern is down, and 1 shirt made. I plan to do a blue one next, and hopefully find another great pattern before I make 12 of these! Super cute and comfy too!
 It's sunny, it's summery, it's even got butterflies! This little summer dress was really supposed to be a shirt, but like the shirt that was supposed to be a dress, I seem to have a problem when it comes to calculating length :P The fact that I'm not using patterns, and am using pillowcases is key in this trouble- pillowcases are, I have discovered, the ideal length to make a great shirt if you trim them and a fantastic shirtdress as is. This dress-that-was-to-be-a-shirt would have hit the mark spot on, but was given extra length with the addition of the waistband. And really, I'm happy to have a dress since the first one turned out to be a shirt :P
 The shirt-dress is made from pillow cases. 3 of them to be exact- 1 for the front, 1 for the back and then the white one for the straps and tie. This was just an idea I had and I've now refined it, so I'll be posting new "revisions" as I make them. On this one, the back has a bit too much fabric and it sort of bussles at my tush, which I think makes it look more ample than it is. The tie was an afterthought, added because I forgot (somehow) that any item of clothing that falls straight over my bust makes me look enormous. I need something to pull the eye IN between my bust and my hips. So the next incarnation of this will be longer so it can really (decently) be worn as a dress (this I wear as a sort of babydoll with jeans), and will have a wide waist band sewn in. I"m thinking sundress, with tie straps. That being said, I LOVE this shirtdress and in the week since I made it have worn it 3 times. So I'll be making a few more shirts along these lines.
 I love this skirt- it's made from curtains someone gave me as part of my "please give me your old sheets" pleas. So its a recycled/ repurposed skirt, which is fantastic- but its also really stinking cute, which I LOVE. It was pretty easy to make too. I have lost a lot of weight in the past few months (33 pounds, way to go me!), and I really need some new clothes, but being out of work, don't really have the funds to buy any. So I looked around and wondered what I could make some clothes out of, since buying fabric is almost as expensive as buying new clothes most of the time and thought- I'll bet I could make some really cute shirts and pj pants out of pillow cases that people give me to make rugs with. (The pillow cases, for point of reference are a bit of a pain to tear up to make rugs- so finding another use for them really made me happy) The curtains I inherited almost screamed to be made into clothes- its the first thing I thought when I got them. The skirt is an "A" style skirt that I patterned after another skirt I have that I like a lot. I just sort of drew around the skirt on newspaper to make the pattern. In this case, the curtain width was too short for a skirt on it's own, but just right when a long ruffle was added. My sewing machine has quite a few decorative stitches, so I decided to add a sort of daisy patterned stitch to the bottom edge of the ruffle in a buttery yellow. I chose that to sort of mirror the floral pattern that was in the main body of the skirt. I also used the daisy stitch on the waistband. I used a zipper and hook and eye closure so the skirt would lay flat on the hip. The ruffle I made using the "easy" ruffle technique- which is to just do a long running stitch along the edge you want ruffled, then pull one of the threads and push the fabric along, bunching it, and moving it down the thread. I then sewed on the ruffle and zigzaged it to keep the edge neat. I can't wait to wear it!
 ahh, macrame. Sure, it sounds terrifically outdated. Like plant hangers from the 1970's with tons of fringe. However, there are a zillion cool and practical applications that have nothing to do with those lanyards you were never quite able to master at camp.
  Specifically- using 550 cord (parachute cord)to make "survival" items- like a survival bracelet that unravels into 8 feet of usable cord, or this rifle sling knotted in double sennets that unravels into over 90 feet of usable cord. Granted, D is about as likely to encounter a survival situation while deer hunting in Kansas as he is to encounter a winning lottery ticket. But it never hurts to be prepared, and men do love their cool points!
 I plan to fully exploit this art- there are dozens of applications I can think of that durable 550 cord is perfect for. Example: D is super hard on belts. Goes through about 2 of them a year. One made of knotted 550 cord while not adjustable, would certainly last a LONG time!
  Dishcloths- there are probably a thousand ways to make these. I usually use a G hook. You can buy pattern books (the Sugar and Cream brand makes several), a pattern for dishcloths usually comes on the yarn (a 100% cotton, very sturdy yarn), you can use any crochet pattern you like really- all single crochet like the peach one shown, all double crochet....you can do something like the red one- 2 double crochet (dc), chain 1 (ch1), skip 1 then 2 dc in next chain, repeat. LOTS of options. Two designs that I like, but are not shown yet are 1) to make a dishcloth that has a lot of different stitches, a couple rows of sc, couple rows of dc, a row of 2dc ch1, skip 1, repeat, a few fans or popcorns, and so forth. Sure, this doesn't give you the most beautiful dishcloth ever, but it is a VERY versatile dishcloth. The combination of textures makes for a great multipurpose counter scrubber, dish washer and general surface cleaner. I made one for my brother in law for his birthday, and he loved it so much he requested that I make him several more. Also, a design that I like but have yet to try is to make a cotton dishcloth that has a scrubber pad in the center. Another design I'd like to try is a sponge encased with crocheted scrubbyness- I believe that tulle or net is usually used for these.
Perhaps my favorite crochet project to date is my pot scrubbers. For very, very little investment (Tulle and net are about $1.20 a yard when not on sale), you get perhaps the best pot scrubber out there- it will work to clean cast iron, stainless steel, aluminum, and even teflon. Since the scrubber is made from plastic, you do not need to worry about it damaging any surface. I prefer to make my scrubbers from 2 strips crocheted together- 1 of tulle and 1 of net, and I usually use similar or complementary colors- light and dark pink, light and dark purple, blue and white, purple and green and so forth. These little beauties are best made in 1 of 2 sizes- the first being 1 row of single crochet into the base chain, and the other being 2 rows. To do these, first chain 4 then curl the tail around so you've got a tight circle. Single crochet in the first chain to make a circle. Then single crochet AROUND the base chain (not thru it like you normally would) as many sc's as you can fit- scrunching to push them tight. (this would be 1 row). To tie off, knot the free end thru the first sc you made and work the end in. To do the double row, instead of tying off, sc in the 1st sc of that first row. Continue to sc until you reach the beginning of row 2, then tie off in the first chain and work the end in. You can also make a scrubber either 2 rows or larger, out of tulle (the smaller and finer of the 2 options) and use it as a body scrubber or heel scrubber.
Oven mitt- After our recent move, we were without an oven mitt- the old one having gotten a hole in it where the web of the thumb was. Being tired of burning the web of my thumb, I threw it away in a moment of frustration- then went months having to fetch items from the oven with a towel. Then one sleepless night I got the bright idea to make an oven mitt. I used the 100% cotton sugar and cream yarn, and starting with just a few chains that I then joined to make a circle, I worked around and around in circles of single crochet, gradually increasing and then maintaining the count to make what, at first, looked like a basket. I made what was essentially a large button hole for the thumb, by breaking away from the mitt and chaining approx 20 stitches then tying back into the piece. when I made my way around on the next row, I crafted the chain loop into the body of the mitt- the chain loop resulted in the hole. Then when I was done with the mitt, I worked the thumb on- I just started to sc around the thumb hole, gradually building it up, and then reducing to taper. In retrospect I should have reduced my stitches properly, or made a separate thumb the same way I did the mitt and attached it. The tip of the thumb on this one reminds me of something from Dr. Seuss. But most importantly, it works GREAT as an oven mitt. I have yet to get burnt! And it was pretty good practice.
 This picture, and the above picture are of rugs I've made- my lovely little (not so little really, it's about 5 feet long by 2 1/2 feet wide) kitchen rug is the white and yellow one, the more modern black and pink rug is in the bedroom. I used old sheets, torn into 1 1/2 inch strips, and double crocheted them with a Size P hook. Instructions for rug making can be found in an earlier post in this blog. These rugs are particularly useful in kitchens, where you might find yourself standing at the sink or stove for a long time and they add a lot of comfort to a hard floor. They also make lovely bathmats. An added benefit of these rugs is how easy they are to care for- just throw them in the wash as you would with sheets :D
 Really this post is more for my own selfish devices than about sharing something particularly meaningful. I come up with so many crochet, knit, sewing and miscellaneous projects, and a lot of them get purchased or gifted away, that I just needed a place to keep track of things I've made. You never know, I might want to make them again. And of course if any of my dear readers want to try their hand at something I've made then it all works out for everyone ;)