Pages

Monday, May 10, 2010

DIY Gifting- Handmade Seed Cards

In honor of Mother's Day, albeit this post is going up a day late, I give you handmade seed cards. What better way to show mom you care than by giving her a ready to plant bouquet of her favorite flowers in a card that you've made just for her? These cards are also fantastic to use for any other occasion, birthdays, holidays, thinking of you...you name it. The real beauty of this project is that it really can be done at any age. Little ones should have an adult help, but even they can make a card themselves.

My friend Lea had asked me if I knew how to make these, as she wanted to make some for her clients. Of course, I was more than happy to help her out- since I used to make papers in my fibers classes and always thought it was a lot of fun.

Required Hardware/Software:

Blender - I have one that is specifically for crafting in case I either break it or put something in it I wouldn't really want to come in contact with my food.
Large, flat-bottomed basin- I use an inexpensive cat litter box that you can pick up at the dollar store
Assorted paper- White printer paper from your recycle bin, paper towels, construction paper in various colors, scraps of cardstock, whatever you've got on hand. Newspaper will work, but the ink in it makes for a gray, rather unpretty final result. I suggest paper that's not printed.
Screen- I used the aluminum sort of window screen. You may be able to make the fiberglass stuff work, but I've always thought it tears awfully easy. I plan to re-use the frames, so I wanted to be sure they'd last. I find it easier to make some frames to hold the screen- instructions below
cheap wood slats to make frames
several packets of seeds- I used wildflowers as the "wildflower garden" seems to suit this project especially well in my mind. I also love the idea of an herb garden.
Food color, paintbrushes, rubber stamps, paper punches, etc. for decorating

Frames: The best way to make the frames is to find inexpensive slats of wood, and sandwich the screen between the slats. To do this, you'd make frames the same way we did, but make 2 sets of the wood for each finished screen. Then you would cut your screen to size, sandwich it between the 2 screen frames and use finishing nails to hold it all together. We opted to just use the 1 wood frame for each screen.

First, cut your wood slats into the appropriate lengths. We mitered the corners, which is pretty simple once you get down to it. Each wooden piece will have a short side and a long side, and each of the ends will be cut on a 45 degree angle. If you want a frame with finished inside dimensions of 4"x6" (about standard postcard size) you'll want to make sure you cut 2 slats with the short side measuring 4" and two with the short side measuring 6". As I said, cheap wood is good for these- we determined that a pine yard stick ($0.62 at the Home Depot), was the cheapest source of wood- they were about 1 1/2 inches wide, 1/4 inch thick and obviously 3 feet long. You can cut them with a miter saw, hack saw, any sort of handsaw, whatever you have.

Lay out your frames (I did this on my patio so I wouldn't tear up my table). Using a staplegun, tack the corners together. I used 2 staples per corner- one on the outside and one on the inside. This seemed to hold pretty well.

Cut your screen to about 1 1/2 inch longer and wider than the opening in your frame. Then carefully (screen WILL poke and cut you, and it stings like a splinter) fold each edge 1/2 inch. When you've done all 4 sides, fold each side 1/2 inch again (to completely fold in the rough edge). This should give you a rectangle of screen that is still 1/2 inch longer and wider in each direction than the opening of your frame. Using your handy staple gun again, and working from one end to the other, tack the screen in place on the opposite side of the frame from where you stapled the frame together. I found it easiest to secure 2 corners and the side between them, then gently pull the screen tight as you staple until you've stapled the whole thing down. It's not critical to get it all tight or even. We made 13 frames since it's easier to work with the paper (which has the consistency of wet toilet paper at first) if you let it dry overnight before trying to move it about. Having a lot of frames lets you make a number of cards at once, rather than having to stop and start a lot.

If you're making the frames by the sandwich method, skip the screen folding step. Just tack the screen in place to one frame with a few staples, then secure the 2 frames together.

Once your frames are done, you're ready to make paper. First, fill your basin about half way with warm/hot water and set it on your workspace. The basin is where you will "lay out" your paper, and makes the pulp tremendously easier to work with.

Then fill your blender about 1/3 to 1/2 way full of HOT water. Hot water from your tap is fine. Tear up several sheets of paper into pieces about 1 inch square, and toss them into the hot water in your blender. It's best to let them soak for a couple of minutes to loosen up the fibers in the paper. Starting on low and working up to high, blend the paper and water into a pulp. It should be watery, but there should be plenty of paper pulp to work with. If you don't have much, add more.

This is your base. From here, the sky is the limit- let your creativity go wild. You can add some shredded construction paper to color the whole mass, or if you want a lighter tint you can add a couple of drops of food color. One of my favorite "details" is to shred a couple of different colors of construction paper into tiny bits or use a paper punch to get circles, stars, flowers, whathaveyou, and toss those into the white or tinted pulp and just stir. Then you get a sort of confetti or stained glass pattern in your final paper. You can add dried flower petals or herbs, Play around with this and have fun.

Once you've got your pulp looking the way you want it to, stir (don't blend) in some seeds. You'll have to sort of guess at the amount, but a bit of trial and error will get you where you want to be. A teaspoon or two should do the trick to start out.

Next, place a frame in your basin. Since I used pine, my frames conveniently float, which will keep your seeds from floating away. (If you have trouble with the seeds floating anyway, just lift the frame out of the basin a bit while you're pouring the pulp.) Gently pour some of your pulp into the frame, trying to get a thin, even layer. If you plan on doing single layer cards, keep adding pulp until its about 1/8" thick. For 2 tone marbled cards, pour the pulp in a little unevenly, then go back over the thinner spots with your second type of pulp.

After you've got your pulp poured, drain the frames a bit on the side of the basin. You will want to do pretty much everything in your power to get rid of excess water to speed drying time. After the excess has drained out (you can hold the frames vertically to drain a bit more as well), you can very gently press your hands together on each side of the paper to squeeze out some more water. Just be careful when you peel back your hand from the wet paper though, as it is very susceptible to tearing. If you want a sort of tye dye effect, you can paint on some food color or water color at this point. The colors will likely bleed all over, so be sure you don't let this frame touch any other for a while.

After as much water has been removed as possible, lay your frames out to dry. You can put them on towels, or paper towels or whatever you've got that will work. I put my frames on some old refrigerator and tomato racks I had to allow for better air circulation. Baking racks would work just dandy too. Having racks available is especially nice once you've taken the papers out of the frames for the final drying. At this point, you can use food color or water color to paint a design that will run a bit, but not all over. Put them near a fan or heat vent to dry. Allow them to sit for at least 8-12 hours (or overnight) before taking the next step.

Next, I put paper towels (or napkins) on each side of the paper and squeezed to get more water out. The less moisture that remains in the cards when you try to handle them, the less likely they are to tear. Then, turn the frames upside down (so the paper will fall to your workstation) and gently tap them. If you're really lucky, the whole card will fall out in one neat piece. More likely, one end will come free and you'll have to gently coax the rest out. If you get any tears, just gently press them back together with your finger. Lay the paper on your racks to finish drying.

Once the cards are dry, you can finish decorating them. You can punch holes and add a ribbon, use markers to write a message, or use your stamp pad to stamp a garden theme (or valentine's Day or Christmas, whatever holiday you're going for) on the card. I will note that some markers will tend to bleed a bit on the loose fiber of these cards, so you might want to write your greeting on a piece of cardstock and attach that to the seed card- or at least test the markers first. Make sure you include instructions for planting the card! (Instructions will be to plant it at the depth the seed packet indicates. If the packet gives a certain spacing, you could indicate that the card needs to be torn up before planting.

Saturday, May 8, 2010

Strawberry Butter vs. Strawberry Butter


When I was looking for a recipe for Strawberry Butter (see last post), I couldn't find any at first that were for cooked pureed strawberries. What I did find was a couple dozen recipes for "strawberry butter". Basically, it's butter. With strawberries. Pretty simple, and sounds delicious.

Obviously, you'll need some butter. I'd recommend using the real deal for this. Just basic salted butter. Also, you'll need some strawberry stuff. I saw recipes that used real, whole strawberries and some sugar. I saw recipes that used crushed fresh strawberries and strawberry jam. I saw recipes that just used strawberry jam and butter. I think it pretty much will work however you choose to make it.

Of course, if you've got a batch of lovely homemade strawberry butter on hand, you could mix that in.

What you want to do is let the butter sit at room temperature so it is soft but not melted. Then mix in as much strawberry ingredient(s) as you wish. When you're done, you've got strawberry butter. It's sweet, creamy, salty- all mixed up in one.

Excellent on pancakes, waffles, toast, and of course on hot biscuits. Just thought I'd give you a choice of what sort of strawberry butter to make :)

DIY Gifting- Strawberry Butter

Another installment of DIY gifting. Frankly, this probably could have been attached to the previous post on apple butter and just been called "Making Fruit Butters" or some such thing, but strawberry butter is soooo amazinglyFantasticallyGood that it really deserves its own post. A note before you begin though- make strawberry butter when you've got something going on that will keep you in the kitchen for an hour or so. You don't want to leave this stuff unattended for long, and if you don't have something else to do, it would be brutally boring to just hang out watching butter bubble.

The process is essentially the same as for making apple butter. You wash about 3lbs of strawberries (I used just a few berries short of 3 quarts), remove the tops and cut into pieces. Yes, it's time consuming. It took me the better part of 30 minutes to do just the cutting up part. But it's worth it, trust me!

As you're cutting the berries up, toss them into the blender. After the addition of about every 1/2 cup of berry chunks, you'll want to puree them. In my first batch I added about an ounce of water just to get the berries going, but the second batch I didn't have to add any water-n you really want to avoid adding extra water if you can as it will have to be cooked off later.

Eventually, you wind up with about 5 cups of strawberry puree (at this point you could do all sorts of fun things with it- you could put it in a squeeze bottle to put on ice cream, you could make jam or run it through a fine sieve to strain out the seeds and go on to make jelly, you could add some simple syrup and sparkling white wine and put it in a sealable container in the freezer and make a sort of sorbet...mmmm, gotta love strawberries!). Put the puree in a large pot on the stove and heat on low-medium heat. Once it starts to steam, you can add about 1/4 teaspoon of citric acid (which you will have on hand if you make your own dishwasher detergent. It's available at brewery supply stores. If you don't have any handy, use about 1/3 teaspoon of Kool Aid powder- lemon lime works best. That stuff is almost pure citric acid. If you don't have either on hand, use a Tablespoon or so of lemon juice. Any of them will enhance the strawberries' tart bite, and also preserve the color. I used it in the first batch, but I really think I liked the second batch where I didn't use it better.) Let the butter cook, gently bubbling, for about an hour- you should notice it getting thicker after about 1/2 an hour. Make sure to stir it every few minutes so it doesn't stick in the pan. After the butter has cooked down to about the consistency you want it to be, add 1/2 cup sugar. If you add the sugar later in the cooking process, rather than at the beginning, it will be less likely to stick. The sugar part of this is a little tricky, as everyone likes a different amount. I tend to err on the side of caution with the sugar- you can't take it out once it's in. The recipes I've read say use 1 cup sugar for every 5 cups of strawberry puree. Let the puree cook get good and hot again after you add the sugar to make sure it all dissolves. It will be gently bubbling at the right temperature. DO NOT TURN YOUR BACK ON IT! Unlike applebutter, which you can ignore for long periods, strawberry butter will stick to the bottom of the pan at a moment's notice and the part that sticks, while still tasty, will turn a sort of dark brown/black color. Not very pretty in your jar when done. You can make it as thick or runny as you desire, but the key to remember is to make it a little runnier when hot than you want it once it is cooled. Obviously, it will thicken as it cools. Once it is at the point of thickness you want it, taste it and make sure that it is sweet enough to suit your taste. If you want it sweeter, add more sugar. If you like it fine, leave it. The amount of sugar you use will probably vary with every batch anyway, as the berries may be more or less ripe and sweet each time.

I then covered my strawberry butter and removed it from the heat to sit overnight. This is by no means a required step, but I prefer to be able to sample the taste and texture of my final product before I can it.

Now you're ready to can! You should remember to write the name of what you have made and the date on the canning flats BEFORE you start, as its so much easier to do before they are on top of a jar. I always forget. But I guess the important part is to make sure you've got the jars labeled. I used the water bath method described in the apple butter post. Same exact technique- you just need to bring your butter back up to where it is just about to bubble and it's ready to go into the hot jars. I'd have to say that my canning funnel is one of my more favorite possessions. Work quickly, but you can probably avoid making as much of a mess as I always do! Any jars that don't seal should go straight into the fridge to be used first- they should last a couple of months at least.

Once the strawberry butter is canned, it's ready to gift. I usually take the rings off and lay a square of pretty fabric on top, replace the ring and tie with a ribbon. Something else that looks very nice is to do a little cross stitch pattern and put that under the ring. Either can be made specific to the gift giving occasion. Christmas? use red and green or holiday themed fabric. Or cross stitch some holly berries or a wreath. Birthday? Find some pretty fabric and use a bunch of ribbon, or cross stitch "Happy Birthday". Hostess gift? Use the hostess' favorite colors, or find something to match her kitchen. You get the idea.

Another fun idea is to use strawberry butter in a gift basket. If you're like me, you make different things at different times of year. Apple butter is made in the fall or early winter. Strawberry butter is made when strawberries are at their peak (and inexpensive to buy!). So you could make a dozen jars of it and use them to make gift baskets at any time of year. The possibilities are vast, but a few ideas are: Mother's Day: make mom a "breakfast in bed" basket- a jar of strawberry butter, a jar of applebutter, a loaf of crusty bread or some croissants, a spread knife with a pretty handle, some fancy coffee, and wrap them all on a cutting board or a pretty platter. Add a large flower to the bow. Or a picnic basket- a gift idea that works for just about anyone. For men: buy a fishing creel or a small cooler and pack it with a few other "snacky" goodies. Another fun idea would be for a little girl's (heck, or a big girl's) tea party- a few mismatched pretty plates and tea cups from the thrift store, a pretty piece of fabric for a tablecloth, a loaf of bread baked into a fancy shape (flowers and hearts are what you usually see), some fun teas and you've got yourself quite a party!

Enjoy the strawberry butter- it is so worth every second of the couple of hours it takes to make. And happy gifting!

Friday, May 7, 2010

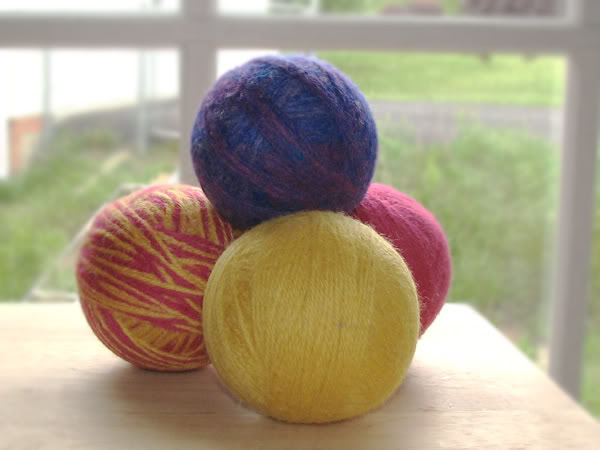
Make Your Own Dryer Balls

As part of my ongoing attempts to save more money, use less energy and have a 'greener' household in general, I decided to try dryer balls. I picked up a pair of the sort of PVC (I guess- they're pretty hard plastic) ones with the little nubbies all over them. And they work GREAT! I have to say I love mine. One of my followers, themiscellaneousbride, didn't have a kind word to say about them indicating that they tore holes in her clothes and she missed the April Freshness of fabric softener, but really I've been super impressed. They cut my drying time in half, make my clothes, towels, sheets, etc. super soft and fluffy and while I can't say I've ever had any trouble with static in my clothes, the dryer balls certainly didn't make it any worse. I will note that when I used them I tucked them into the clothes so as to avoid having them clang around in the dryer too much. In general anything that makes your dryer thump is very hard on it. Besides, I figured that the whole purpose of the balls is to get pockets of air into the clothes so they dry faster, and static is produced when fabric rubs on fabric, so if there is something in the way that prevents the fabric from rubbing on itself, then the static should have a harder time forming, right?

Anywho...So the dryer balls I got from Aldi are brilliant, and I got them for a song- they were $3.99 (unfortunately they aren't carrying them now)- compared to the $10-20 that I've seen identical ones go for. But storebought dryer balls just weren't green enough or DIY enough to suit me. Surely you can make them yourself?

Of course you can. The gear for the job? A bunch of yarn, a pair of old pantyhose or trouser socks and a crochet hook. Most of the websites I saw indicated you should make them out of 100% wool yarn. But that's pretty expensive unless you happen to own sheep, or have inherited a lot of wool yarn. So I bought 1 skein of a relatively neutral color of wool (it needs to be 100% wool so it will felt properly), and I had some cheap poly yarn on hand (Red Heart brand, if you're counting). The idea is to make a "core" of poly yarn, then cover it with several layers of wool yarn, which you will then felt. Once felted the yarn won't unravel.

You start with the poly yarn and wrap it around and around your hand until you've got a nice hunk of yarn. Gently slide the yarn off your hand.

Then, wind the yarn around the center of the loop you just made. And around and around....several times. just to really secure it.

Next, fold the mess in half and wrap the free end of the yarn around that. It WILL look like a mess at first, but keep wrapping. This is the foundation of your yarn ball. The idea is to continue wrapping the yarn, and rotate the ball ever so slightly on each turn, so that the yarn doesn't overlap itself.

Eventually, you'll have a lovely sphere of yarn. When the sphere is as large as you want it, cut the yarn and use the crochet hook to pull the tail through the ball so it is secure.

Then wrap the poly yarn ball with at least 3 layers of wool yarn. The ball needs to be completely covered in wool in order for it to felt and hold the poly yarn core inside. Since poly yarn won't felt, if it was exposed it would just turn to a giant mass of spaghetti in your washer/dryer.

After you've covered it in wool, use the crochet hook to pull the tail of the wool yarn through the ball to secure it, slip the whole ball into the toe of the hose. I used a trouser sock. They were 2 pairs for $2, and I'll be able to reuse them since I could just slip the ball into the toe and not have to knot it. Then toss it in your washer. I had to wash mine several times and dry it several times before it really looked like it was felting. Basically, felting is just agitating wool in water. The hotter the better, but it will still felt in cold. You could do it by hand.....but I found it easy to just toss it in the wash then move to the dryer with the clothes. When that load was dry, I tossed the ball back into the washer for the next load.

After about 3 wash and dry cycles, I had a partially felted ball of yarn. At this point, you will want to pull it out of the sock and wrap with several more layers of wool yarn. Pull the tail into the ball with the crochet hook, put it back in the sock and felt again.

Once it's felted, you have a completed dryer ball. Just toss it in the dryer with your laundry. I would say that in theory, a wool dryer ball would be kinder to your clothes than a PVC ball would, and wool is an ideal material for dryer balls as it is a renewable fiber and also will not burn.

There is also a method of making dryer balls from old (felted) wool sweaters. I'll try that as soon as I can score a free wool sweater. Stay tuned for that one!

Once my yarn dryer ball finishes it's final felting, I'll post a picture! Happy felting!

Wednesday, May 5, 2010

Repurposing- Produce Bags from Bath Poufs

I need to make new bath poufs. I'm sick of the ones we buy (for a dollar, can't *really* complain) falling apart after a few months of use. So I'll be making some out of washclothes once I figure out exactly what I want them to look like. I figure those should last for at least a couple years instead of a couple months. But what to do with the net one that just fell apart?

So when you cut the cord off the pouf, you're left with about 15 feet of continuous tube netting. There are probably all sorts of things you can do with it at this point. I was thinking originally about making it into pot scrubbers, and it would also work for keeping your delicates corralled in the laundry. But it also makes dandy bags for produce or wild harvest.

All you have to do is tie a knot in the end (I twirled the net a bit to make it sort of a cord then knotted it- this helps you be able to pull it tight). Pull the knot very tight or it will come undone.

Then you cut the net to the length you want, so that you get the size of bag you want. I cut 2 of mine super long to hold cattails, and then a few small ones to hold fruit or veggies at the market, or wild harvest items.

**NOTE** One of the bags I made seemed to tear awful easily. I'm not sure if that was just a weak spot on the net, or what. But until I am able to test them out further, I'm not sure that produce bags are the best "repurpose" for bath poufs. It did work just dandy to tie around bundles of cattails to keep them together for lugging back to the car, and would also make a nice dish sponge. Oh well, you live and learn, right? :)

Thursday, April 29, 2010

Project Gallery

one of the "it might as well be spring" slippers. I just need to embroider the 2nd one and felt and they will be ready to wear!

Baby hat I made with really wonderfully soft chenille yarn for my acupuncturist's new baby. I admit I was a little jealous of her wee one getting to wear something this lusciously soft while I went without LOL!

Calorimetry- a short row shaping project. This one undertaken for my friend who wanted a head wrap to keep her head and ears warm that didn't require one to have their hair loose. I am seriously in love with this yarn! And one of these days I will undertake a Calorimetry for myself.


The infamous mitten...my first major fair isle project, my first mitten. It was crafted during the days this winter when my resolution to learn every knitting technique, pattern and style that I did not already know was still steaming away at full speed ahead. And the pattern was clearly written by a crackhead for whom English was a second language- with NO errata sheet available! it turned out to be an enormous exercise in frustration and is presently serving as a reminder to me that a) second mitten syndrome really is a plague suffered by many knitters and b) perhaps painfully complicated projects should NOT be undertaken on a "now make another one" scale :P

"Snips and snails and puppy dog's tails" booties I made for my acupuncturist's new little baby boy. Made from super soft felted wool with embroidery added after felting, these were so adorable and snuggly I knew I was going to have to make a pair of felted slippers for myself. Ah, the perils of crafting- for every one item I make to gift or sell, I have to make one for myself as well!

Yarn Tamer- another item that I'm going to have to mass produce for the holidays this year. I know a lot of people who would love this dandy little zippered pouch to keep their yarn from tangling while working projects.


A few tea wallets- these brilliant little purses hold a few tea bags or other drink packets, as well as sugar or honey to keep them tidy in purse or pocket for the journey to work or about town. They make fantastic last minute gifts, are easy to knit, crochet or sew at a moment's notice and I keep telling myself I need to keep a few on hand at all times for hostesses, etc. but I give them out too fast!!
And lastly, a cowl I fashioned from the cowl neck off of a lovely blue merino wool sweater. After I cut the cowl off, I used my serger to seal the cut edge to prevent fraying and I get a ton of use from this one too!

My favorite cowl- candleflame is the name of the pattern and I thought this yarn really lent itself well to a pattern by that name!

Another cowl- they really are indispensable in a girl's wardrobe- I wish I had one in every color!

2 cowls- the rosy colored one was my first cowl knit in the round- made from a delicious alpaca blend in a pattern called "lettuce vine". The button up is ADORABLE on, but almost too warm to wear indoors!

This hat, which is now hubby's, was the "rough draft" for the hat I made my brother in law for his birthday. The final product had a checkerboard effect with the skulls- alternating white and gray, which too, FOREVER to finish! That's the only trouble with knitting- it takes about 3 times longer than crochet to finish!


A collection of aprons I made for my relations for Christmas from tea towels- an infinitely useful thing to have an apron made from! And I thought these were super adorable to boot :)


Hats for my nephews for Christmas- I think they were a hit. Made of snug fleece, I was well proud of them!

My fetching owl hat. I found the pattern and loving all things owl, HAD to have one. Did I wear the super warm hat all during the cold winter? Nooooo, I wore the adorable owl family!

The COMFIEST PJ pants ever! Made from my favorite source of soft fabric, sheets, these were also a Christmas present for D, but he almost didn't get them at all! I was a good wife and didn't steal them from him before gifting- I figured that was a surefire way to end up on Santa's naughty list ;)

Welding Apron I made for D for Christmas- it's getting a lot of service as he finishes up patching in the new floor in the Chevy!!


My superwarm winter hat- in pink and camo! My favorite colors! Naturally, once I got the hunting hat done for hubby, I had to have one myself :)

This Raiders scarf I had to make double time for my boss for our "secret santa" at work. I was hoping I'd draw a female so she could get some of the ever popular fingerless mitts, but... LOL and of course- no pressure crafting for the boss! But all in all, despite the fact that it took about 3 hours to stitch the insignia on, I think it turned out quite well!

This darling little hat I made for my hubby to keep him warm for hunting. Blaze orange and camo yarn! I do recommend using the super bulky yarn for warmth though- if I'd have used just worsted weight it wouldn't have been warm at all so many thanks to Jenny for the tip! In fact, I loved it so much I'm going to make one for myself, once the holiday crafting is complete anyway. And once I relearned how to purl after 20 years of not doing it, knitting in the round was a snap! :)

My first pair of fingerless mitts- I think they turned out quite well. And they've been a lifesaver at the office where its always soooo cold! They're lovely for gifting too!


A lovely pair of fingerless gauntlets with interchangeable ribbons - made as a gift for a dear friend who is moving to California.


My Halloween skirt- I fell in love with the fabric and had no idea what to do with it until my friend Peaches made an adorable tiered skirt for her friend's daughter. I added hot pink polka dots and tulle for an edgier look, and it has gotten tons of compliments so far!

Based on some scarves a friend has for her dog to wear in the winter, that are supremely cute (even if not real practical), I made this thinking perhaps I could make some to give my dog owner friends for christmas. I think it turned out very cute, although I did make the keyhole with 2 chains and should have only used one so it wouldn't gape quite so much. I'll do better with the next one!

A lovely nightgown/chemise that i made from a sheet and some lace and ribbon. I based it on a renaissance "tunic" I used to make to go under a vest and skirt. The hubby picked it out of a pattern book, and it was surprisingly easy to make. There are plans in the works for a midnight violet one with pale pink lace, and a red one with black lace.

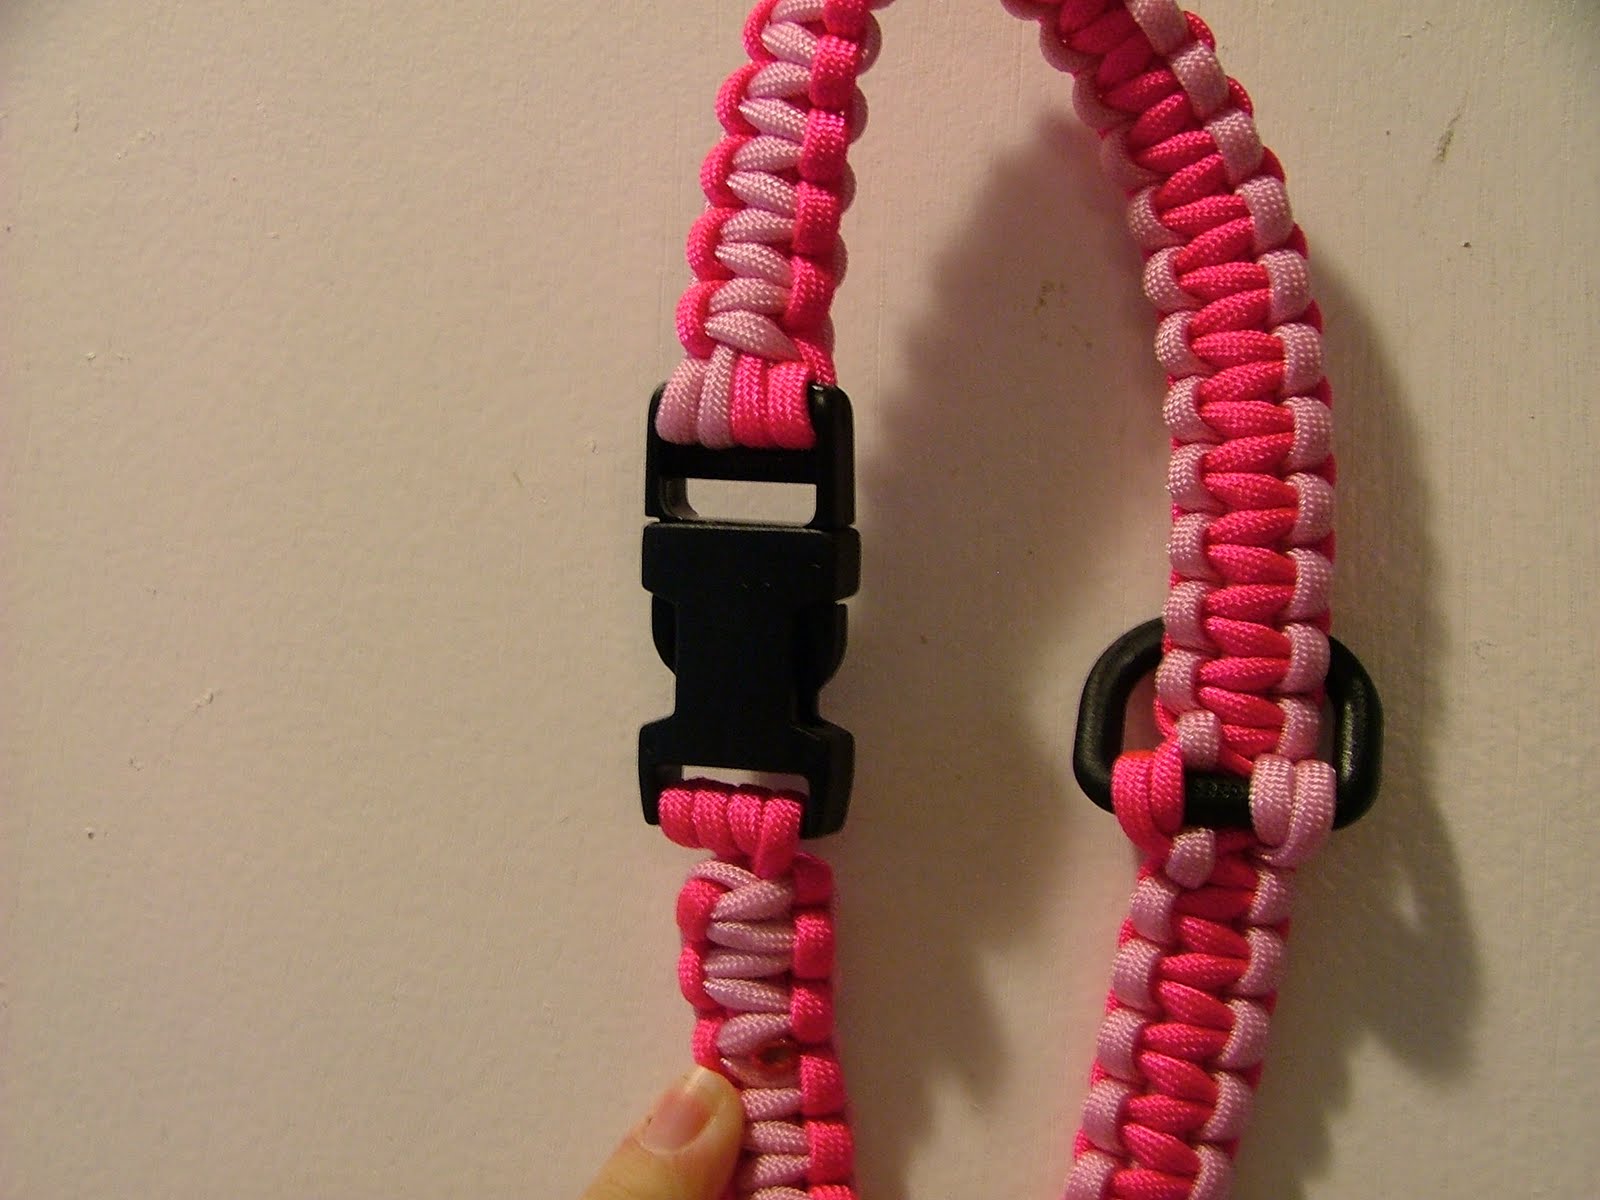
A series of dog collars I've made. These are super fun because they're reversible, and pretty much guaranteed that your dog can't destroy them! Eventually, Sadie did outgrow the single knot collars, and has not moved on to double knot. I LOVE her new collar!

Another apron, this one made from a men's pajama shirt. I've never used a full length apron before, and this one has now become my fave kitchen apron :)

My recent obsession has been with apron making. This one is for my mother-in-law.


A bunch of shirts made this week- I've been a flurry of activity with sewing! Still have a few more projects up my sleeve that need to get done too, so stay tuned!

The rug I made for Mother's Day for D's mom. The oblong rugs are a little tricksy, but this one turned out really well, I thought, and she loved it! I've got another rug in the works already, but am having a little trouble working it so it lays flat. So it could be a while before that one shows up LOL!

I LOVE this shirt! and now I have something else cute to wear so I can stop wearing the yellow one all the time :P This one is based on a shirt that belongs to a friend that I loved so much I had to borrow it and figure out the pattern. It took several frustrating hours, but the pattern is down, and 1 shirt made. I plan to do a blue one next, and hopefully find another great pattern before I make 12 of these! Super cute and comfy too!

It's sunny, it's summery, it's even got butterflies! This little summer dress was really supposed to be a shirt, but like the shirt that was supposed to be a dress, I seem to have a problem when it comes to calculating length :P The fact that I'm not using patterns, and am using pillowcases is key in this trouble- pillowcases are, I have discovered, the ideal length to make a great shirt if you trim them and a fantastic shirtdress as is. This dress-that-was-to-be-a-shirt would have hit the mark spot on, but was given extra length with the addition of the waistband. And really, I'm happy to have a dress since the first one turned out to be a shirt :P

The shirt-dress is made from pillow cases. 3 of them to be exact- 1 for the front, 1 for the back and then the white one for the straps and tie. This was just an idea I had and I've now refined it, so I'll be posting new "revisions" as I make them. On this one, the back has a bit too much fabric and it sort of bussles at my tush, which I think makes it look more ample than it is. The tie was an afterthought, added because I forgot (somehow) that any item of clothing that falls straight over my bust makes me look enormous. I need something to pull the eye IN between my bust and my hips. So the next incarnation of this will be longer so it can really (decently) be worn as a dress (this I wear as a sort of babydoll with jeans), and will have a wide waist band sewn in. I"m thinking sundress, with tie straps. That being said, I LOVE this shirtdress and in the week since I made it have worn it 3 times. So I'll be making a few more shirts along these lines.

I love this skirt- it's made from curtains someone gave me as part of my "please give me your old sheets" pleas. So its a recycled/ repurposed skirt, which is fantastic- but its also really stinking cute, which I LOVE. It was pretty easy to make too. I have lost a lot of weight in the past few months (33 pounds, way to go me!), and I really need some new clothes, but being out of work, don't really have the funds to buy any. So I looked around and wondered what I could make some clothes out of, since buying fabric is almost as expensive as buying new clothes most of the time and thought- I'll bet I could make some really cute shirts and pj pants out of pillow cases that people give me to make rugs with. (The pillow cases, for point of reference are a bit of a pain to tear up to make rugs- so finding another use for them really made me happy) The curtains I inherited almost screamed to be made into clothes- its the first thing I thought when I got them. The skirt is an "A" style skirt that I patterned after another skirt I have that I like a lot. I just sort of drew around the skirt on newspaper to make the pattern. In this case, the curtain width was too short for a skirt on it's own, but just right when a long ruffle was added. My sewing machine has quite a few decorative stitches, so I decided to add a sort of daisy patterned stitch to the bottom edge of the ruffle in a buttery yellow. I chose that to sort of mirror the floral pattern that was in the main body of the skirt. I also used the daisy stitch on the waistband. I used a zipper and hook and eye closure so the skirt would lay flat on the hip. The ruffle I made using the "easy" ruffle technique- which is to just do a long running stitch along the edge you want ruffled, then pull one of the threads and push the fabric along, bunching it, and moving it down the thread. I then sewed on the ruffle and zigzaged it to keep the edge neat. I can't wait to wear it!

ahh, macrame. Sure, it sounds terrifically outdated. Like plant hangers from the 1970's with tons of fringe. However, there are a zillion cool and practical applications that have nothing to do with those lanyards you were never quite able to master at camp. Specifically- using 550 cord (parachute cord)to make "survival" items- like a survival bracelet that unravels into 8 feet of usable cord, or this rifle sling knotted in double sennets that unravels into over 90 feet of usable cord. Granted, D is about as likely to encounter a survival situation while deer hunting in Kansas as he is to encounter a winning lottery ticket. But it never hurts to be prepared, and men do love their cool points!I plan to fully exploit this art- there are dozens of applications I can think of that durable 550 cord is perfect for. Example: D is super hard on belts. Goes through about 2 of them a year. One made of knotted 550 cord while not adjustable, would certainly last a LONG time!

Dishcloths- there are probably a thousand ways to make these. I usually use a G hook. You can buy pattern books (the Sugar and Cream brand makes several), a pattern for dishcloths usually comes on the yarn (a 100% cotton, very sturdy yarn), you can use any crochet pattern you like really- all single crochet like the peach one shown, all double crochet....you can do something like the red one- 2 double crochet (dc), chain 1 (ch1), skip 1 then 2 dc in next chain, repeat. LOTS of options. Two designs that I like, but are not shown yet are 1) to make a dishcloth that has a lot of different stitches, a couple rows of sc, couple rows of dc, a row of 2dc ch1, skip 1, repeat, a few fans or popcorns, and so forth. Sure, this doesn't give you the most beautiful dishcloth ever, but it is a VERY versatile dishcloth. The combination of textures makes for a great multipurpose counter scrubber, dish washer and general surface cleaner. I made one for my brother in law for his birthday, and he loved it so much he requested that I make him several more. Also, a design that I like but have yet to try is to make a cotton dishcloth that has a scrubber pad in the center. Another design I'd like to try is a sponge encased with crocheted scrubbyness- I believe that tulle or net is usually used for these.

Perhaps my favorite crochet project to date is my pot scrubbers. For very, very little investment (Tulle and net are about $1.20 a yard when not on sale), you get perhaps the best pot scrubber out there- it will work to clean cast iron, stainless steel, aluminum, and even teflon. Since the scrubber is made from plastic, you do not need to worry about it damaging any surface. I prefer to make my scrubbers from 2 strips crocheted together- 1 of tulle and 1 of net, and I usually use similar or complementary colors- light and dark pink, light and dark purple, blue and white, purple and green and so forth. These little beauties are best made in 1 of 2 sizes- the first being 1 row of single crochet into the base chain, and the other being 2 rows. To do these, first chain 4 then curl the tail around so you've got a tight circle. Single crochet in the first chain to make a circle. Then single crochet AROUND the base chain (not thru it like you normally would) as many sc's as you can fit- scrunching to push them tight. (this would be 1 row). To tie off, knot the free end thru the first sc you made and work the end in. To do the double row, instead of tying off, sc in the 1st sc of that first row. Continue to sc until you reach the beginning of row 2, then tie off in the first chain and work the end in. You can also make a scrubber either 2 rows or larger, out of tulle (the smaller and finer of the 2 options) and use it as a body scrubber or heel scrubber.

Oven mitt- After our recent move, we were without an oven mitt- the old one having gotten a hole in it where the web of the thumb was. Being tired of burning the web of my thumb, I threw it away in a moment of frustration- then went months having to fetch items from the oven with a towel. Then one sleepless night I got the bright idea to make an oven mitt. I used the 100% cotton sugar and cream yarn, and starting with just a few chains that I then joined to make a circle, I worked around and around in circles of single crochet, gradually increasing and then maintaining the count to make what, at first, looked like a basket. I made what was essentially a large button hole for the thumb, by breaking away from the mitt and chaining approx 20 stitches then tying back into the piece. when I made my way around on the next row, I crafted the chain loop into the body of the mitt- the chain loop resulted in the hole. Then when I was done with the mitt, I worked the thumb on- I just started to sc around the thumb hole, gradually building it up, and then reducing to taper. In retrospect I should have reduced my stitches properly, or made a separate thumb the same way I did the mitt and attached it. The tip of the thumb on this one reminds me of something from Dr. Seuss. But most importantly, it works GREAT as an oven mitt. I have yet to get burnt! And it was pretty good practice.

This picture, and the above picture are of rugs I've made- my lovely little (not so little really, it's about 5 feet long by 2 1/2 feet wide) kitchen rug is the white and yellow one, the more modern black and pink rug is in the bedroom. I used old sheets, torn into 1 1/2 inch strips, and double crocheted them with a Size P hook. Instructions for rug making can be found in an earlier post in this blog. These rugs are particularly useful in kitchens, where you might find yourself standing at the sink or stove for a long time and they add a lot of comfort to a hard floor. They also make lovely bathmats. An added benefit of these rugs is how easy they are to care for- just throw them in the wash as you would with sheets :D

Really this post is more for my own selfish devices than about sharing something particularly meaningful. I come up with so many crochet, knit, sewing and miscellaneous projects, and a lot of them get purchased or gifted away, that I just needed a place to keep track of things I've made. You never know, I might want to make them again. And of course if any of my dear readers want to try their hand at something I've made then it all works out for everyone ;)