 This post was a request from one of my followers, Dan, who was very excited by the "How to Make Jerky" post, and wondered if he could make his fave deli meat at home too. I think perhaps it was almost joking or hypothetical at first that he asked "do you think you could make pastrami too?", but really he should know better! Of COURSE I'm going to find a way to do anything I set my mind to. I knew I had seen various seasonings for different types of meat at the outdoor goods store- pepperoni, summer sausage, and so on, but didn't remember seeing pastrami as one of the options. Heck, aside from knowing that pastrami is made of meat and has pepper on it, I didn't know a thing about it. So, since DH is a big fan of pastrami, I looked into it and was kind of surprised to discover that there were several recipes for it available on the internet.
 Pastrami is a very flavorful, VERY tender and very popular deli sandwich meat. Like corned beef, pastrami was originally created to preserve meat. It is soaked for an extended period in a brine, then partially dried, seasoned, smoked then steamed. When pastrami was brought to the US by immigrating Jewish Romanians (the word pastrami comes from a Romanian verb meaning "to preserve meat"), it was at first made from goose breasts, which were quite cheap. It was discovered that it could be made from the navel end of a beef brisket, which was an even cheaper cut of meat. They devised the method of smoking (to preserve the meat and flavor it) then steaming (which causes the connective tissues in the meat to turn to tender gelatin) to make the final product inexpensive, yet melt in your mouth delicious.
The method I chose allowed me to skip owning complicated or expensive equipment. I have a very nice grill, that technically could, with the addition of some wood chips soaked in water overnight, be used as a smoker. But I'm not the griller in the house, and that seemed like a waste of resources and a lot of work. Fortunately, I found a recipe that you can make in your oven!
 You'll need to get a corned beef. The recipe I used said to get a 5 pounder, but I was only able to find a 3 pounder, so that's what I used. It will more than likely come vacu-sealed in some brine, with a packet of corning seasoning included. This is the type of corned beef you should look for anyway. Open it up, give it a little rinse and pat dry, and throw away the packet of seasoning. Then trim most of the fat away from your corned beef. You'll want to leave about 1/8 inch-ish of fat on it (I left a bit less as you can see above- if you are going to use a different method such as dry curing or smoking you should leave more fat on to keep the meat tender and moist), but you'll more than likely find that the packagers left you with much more than you want or need.
  Then assemble your spices- Coriander, fresh cracked black pepper, smoked paprika, garlic powder and some red pepper flakes for a bit of heat. Put 1 Tablespoon of the smoked paprika, 2 Tablespoons of coriander, and 1/4 teaspoon of garlic powder into some sort of a shaker. The cracked black pepper....I decided that using my pepper grinder for that much pepper would work just fine, but I was WRONG.
  Get an electric coffee grinder, or better yet, use your mortar and pestle. In retrospect, I should have just started out with the mortar and pestle. You could probably get away with using commercially ground black pepper, but make sure it's good and fresh.
  Liberally sprinkle the paprika mixture on one side of the brisket- try to put about half of it on. then sprinkle with 1/8 teaspoon (or how much you want) of the red pepper flakes, and lastly evenly cover with cracked black pepper. The meat will be thoroughly covered in spices, and the pepper will make it look dark. Gently pat the spices onto the meat so that they are encouraged to stick.
 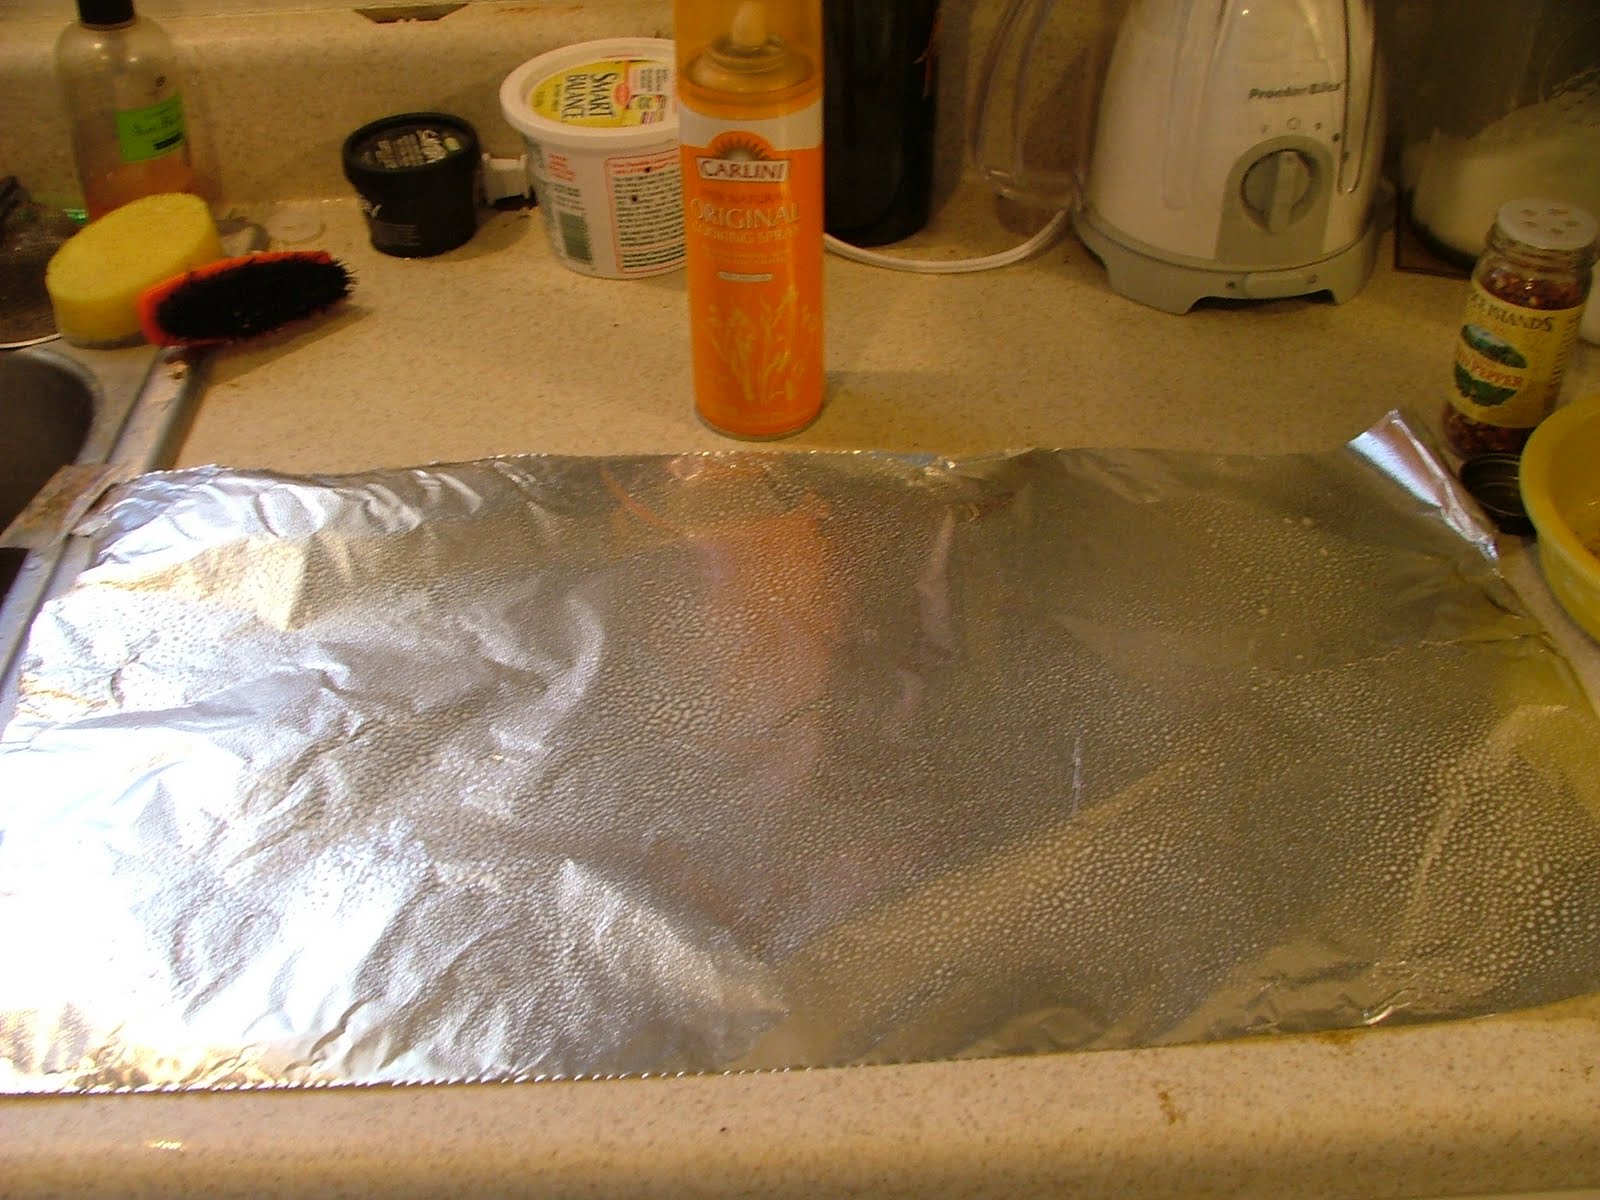 Next, lay out a piece of heavy duty aluminum foil and either lightly oil it or use non-stick cooking spray- I used cooking spray. This will keep the meat from sticking during the very long cooking process.
  Gently turn the brisket over and lay it on the oiled/sprayed foil. Then season the other side in the same manner as you did the first.
  Then you will carefully but tightly fold the brisket in the foil- the idea here is to make sure none of the juices or spices can escape. You want to achieve this so that the spices get trapped against the meat and can do their job. The smoky paprika needs to penetrate the meat to give it the smoky flavor of being smoked, and the primary flavors in pastrami are paprika, smoke, coriander and black pepper. When you're done, you'll have a neat little packet.
  Lay out another piece of foil, this one doesn't need to be oiled, and place the packet on the foil sheet seam side down. Fold the edges the same way you did the first time. Repeat 4 more times, each time putting the seam side down on the next sheet of foil.
  Place the packet (wrapped now in 6 sheets of foil) into a glass baking dish and put it in the oven at 240 degrees for about 5 hours. You might want to do a little less time for a brisked less than 5 lbs. After that time, remove it from the oven and set it on your counter to cool. You'll want to let it cool to room temperature, then refrigerate overnight or 24 hours.
 At that point, you can unwrap it from its 6 layers of foil. If you don't want your pastrami to be spicy, scrape the rub off. Most people prefer the peppery crust to be intact. If you want to firm up the crust and make it stick better, pop the pastrami into the oven at 400 degrees for about 15 minutes. You can then slice it and serve!
Pastrami is generally served as the traditional "New York Sandwich" on deli rye bread with mustard, but the "west coast" way of preparing it is also gaining a following- basically on a hogie roll with a bit of au jus. Any way you slice it (ha!), pastrami is a real treat that you can enjoy fresh at home for a lot less than you'd pay to buy it.
Sure there are plenty of other ways to make pastrami- but this was easy, relatively quick and yielded an EXCELLENT result. I highly recommend it. I left the rub on, and baked it to a crust and while the final result was very peppery and might be more peppery than some would like, it was delicious. I served it on toasted rye bread with provolone cheese and yellow mustard.
If you are unable to find a corned beef or other cured brisket, this link has directions for how to dry cure your own brisket: http://www.virtualweberbullet.com/pastrami.html
You can also brine your brisket, which some say is a more traditional method of preparing a corned beef or pastrami (of course others say that the dry cure is more traditional.) I would think that brining would yield a more tender and moist result than a dry cure would.
Jen this looks amazing! Dan is a very happy man and I will be trying this as soon as i can locate some corned beef :)
ReplyDelete